


MADEA
Dog Bruno
Dog Bruno
Add a touch of charm and functionality to your space with this dog-shaped wall hanger. Crafted from durable oak wood, Bruno features three sturdy hooks, perfect for organizing children coats, bags and other accessories while bringing playful warmth to any room.
Safety: This is a decorative item, not a toy. Keep out of reach of children under 3 years due to small parts (if applicable).
Couldn't load pickup availability
Share


Product information
Assembly Instructions
English: Assembly Instructions for Decorative Wall Hanger
Introduction
Thank you for choosing our decorative wall hanger. We believe it will enhance your interior for many years to come. Before starting the assembly, please check the package contents.
Package Contents:
- 1x Wooden hanger (base)
- 3 / 4 / 5x Wooden screw-in pegs (hooks) (qty varies by product version)
- 2x Wall mounting screws (long)
- 2x Wall plugs (anchors)
- 1x Allen key
You will need (not included):
- Phillips screwdriver
- Pencil
- Drill (for masonry/concrete walls)
Step-by-Step Guide:
Step 1: Preparing the hanger Using the included Allen key, carefully unscrew the metal threaded rods from the two outer holes on the hanger. Keep these parts in a safe place; you will need them for the final step.
Step 2: Inserting mounting screws Take the two long mounting screws and insert them into the outer holes. Using a Phillips screwdriver, screw them in gently so that their tips protrude just slightly from the back of the product.
Step 3: Marking the position on the wall Place the hanger against the wall where you wish to mount it. Press the product against the wall so that the protruding screw tips leave small indentations. Mark these points clearly with a pencil.
Step 4: Wall Mounting
- Option A (Wood/Plasterboard): If mounting into wood, place the hanger back against the marked points and tighten the screws directly into the wall.
- Option B (Masonry/Concrete): Drill holes at the marked points and insert the wall plugs. Then, position the hanger and screw it into the plugs.
Step 5: Installing threaded rods Take the metal threaded rods you set aside in Step 1. Using the Allen key, screw them back into the outer holes. Tighten carefully until they are secure.
Step 6: Attaching wooden hooks Hand-screw the wooden pegs onto the protruding metal rods.
Important: If the pegs and holes are color-coded (e.g., red/green dots), ensure the colors match. This ensures the slanted side of the hook faces correctly upwards.
Conclusion:
Done! Your new hanger is ready to use. 🙂
Dansk: Monteringsvejledning til dekorationsknagerække
Introduktion
Tak fordi du valgte vores dekorationsknagerække. Vi er overbevist om, at den vil pynte i dit hjem i mange år fremover. Kontroller venligst pakkens indhold, før du påbegynder monteringen.
Pakkens indhold:
- 1x Knagerække i træ (base)
-
3 / 4 / 5x Trækroge til indskruning (antal varierer afhængigt af produktversion)
- 2x Monteringsskruer til væg (lange)
- 2x Rawlplugs
- 1x Unbrakonøgle
Du skal bruge (medfølger ikke):
- Stjerneskruetrækker
- Blyant
- Boremaskine (ved montering i murværk)
Trin-for-trin guide:
Trin 1: Forberedelse af knagerækken Brug den medfølgende unbrakonøgle til forsigtigt at skrue metalgevindstængerne ud af de to yderste huller på knagerækken. Læg disse dele til side et sikkert sted, da de skal bruges i det sidste trin.
Trin 2: Indsættelse af monteringsskruer Tag de to lange monteringsskruer og sæt dem ind i de yderste huller. Brug en stjerneskruetrækker til at skrue dem forsigtigt i, så spidserne kun stikker en lille smule ud på bagsiden af produktet.
Trin 3: Markering af placering på væggen Placer knagerækken på det sted, hvor du ønsker at montere den. Tryk produktet mod væggen, så de udragende skruespidser efterlader små mærker i væggen. Marker derefter disse punkter tydeligt med en blyant.
Trin 4: Montering på væggen
- Variant A (Træ/Gips): Ved montering i træ placeres knagerækken ud for de markerede punkter, hvorefter skruerne skrues direkte ind i væggen.
- Variant B (Murværk/Beton): Bor huller ved de markerede punkter og indsæt de medfølgende rawlplugs. Placer derefter knagerækken og skru den fast i plugsene.
Trin 5: Installation af gevindstænger Tag nu metalgevindstængerne, som du lagde til side i Trin 1. Brug unbrakonøglen til at skrue dem tilbage i de yderste huller. Skru forsigtigt, indtil de sidder fast.
Trin 6: Montering af træknager Skru trækrogene på de udragende metalstænger med hånden.
Vigtigt: Hvis knagerne og hullerne er farvemarkerede (f.eks. rød/grøn prik), skal du sørge for, at farverne matcher. Dette sikrer, at den skrå side af knagen vender korrekt opad.
Afslutning:
Færdig! Din nye knagerække er klar til brug. 🙂
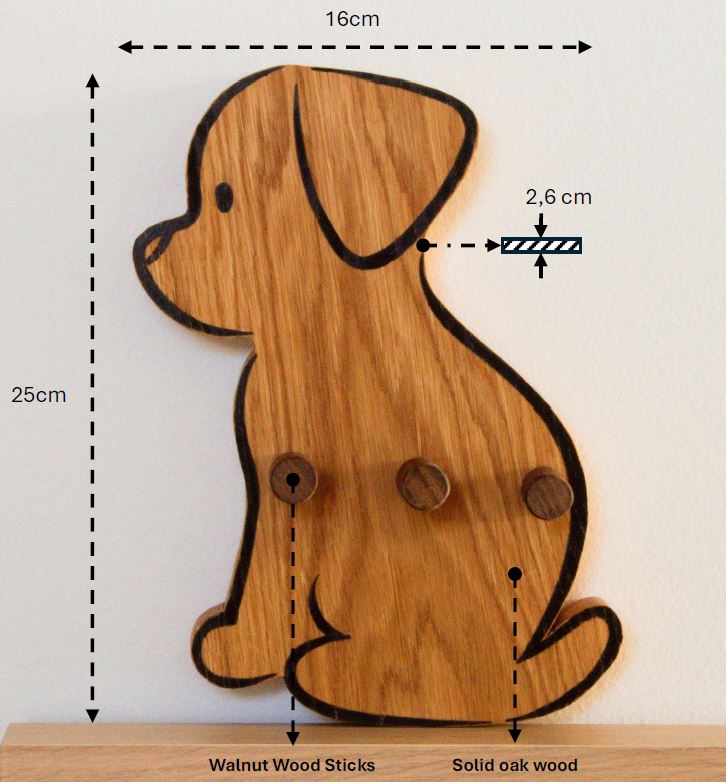
Dimensions
Dimensions: 25 cm (height) × 16 cm (length) × 2.6 cm (thickness)
Material & Care Highlights
- Premium Dual-Wood Build: Hand-selected Solid Oak base for structural strength, paired with a rich Walnut bar for a luxury aesthetic.
- Natural Botanical Finish: Treated with a breathable blend of Carnauba wax, cotton, and vegetable oils—offering a water-repellent surface that feels silky to the touch.
- Fabric Protection (DIN 53160): Certified resistant to saliva and perspiration, ensuring no oils or colors ever transfer onto your delicate garments.
- Family & Pet Safe (DIN EN 71-3): Meets the highest European Toy Safety standards; free from cobalt, biocides, and heavy metals.
- Hypoallergenic: ECARF certified and food-safe, making it the ideal choice for sensitive environments and chemical-free homes.
- Extreme Durability: Built to withstand household liquids and humidity—perfect for everything from open-concept wardrobes to high-end bathroom displays.